Pump example
In this tutorial we will see a more practical example. We will create an APPIO solution which contains three opcuaapps. Two servers and one client who simulate a simple pump control. Before we begin, you need to have installed APPIO on a fully updated Linux. For checking the results of this tutorial an OPC UA front end client like UA Expert by Unified Automation is recommended.
The files needed for this tutorial can be found in the example folder of the github repository.
Overview
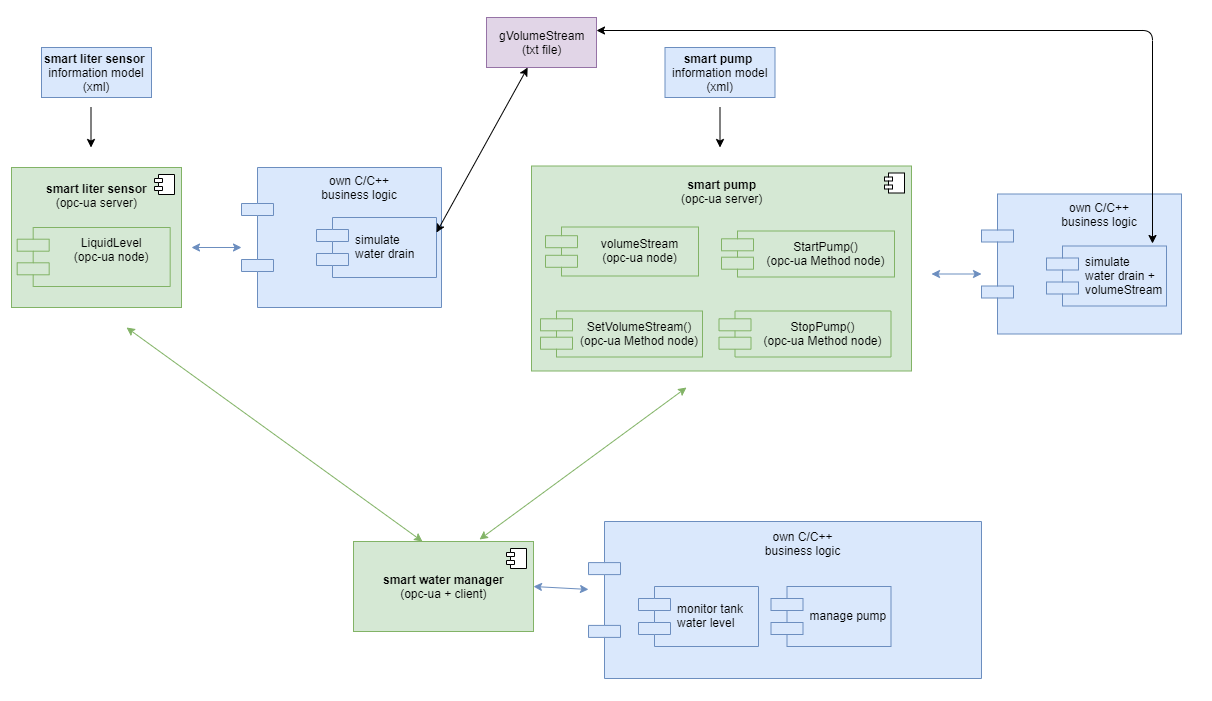
This example contains two OPC UA Servers, which simulate a smart pump and a smart sensor. The smart sensor measures the actual water level of a container, who leaks water. The smart pump increases this level when activated.
The client called smart water manager, gets the actual water level from the smart sensor via an OPC UA Method, and activates/deacivates the smart pump (again over OPC UA methods) accordingly to user defined limit.
Start: Creating the opcuaapps
First we will create the smart liter sensor app:
appio new opcuaapp --name SmartLiter --type Server --url 127.0.0.1 --port 3000 --nocert
This will create the OPC UA server for the pump:
appio new opcuaapp --name SmartPump --type Server --url 127.0.0.1 --port 4000 --nocert
This will create the OPC UA client for the water manager:
appio new opcuaapp --name SmartWaterManager --type Client --nocert
Now all needed opcuaapps were created.
Importing the information model files
The information-models for the SmartPump and the SmartLiter are provided by us. They use the DiNodeset. Execute the following commands:
appio import information-model -n SmartLiter -p path/to/DiNodeset.xml && \
appio import information-model -n SmartPump -p path/to/DiNodeset.xml
Finally we need to import the real information models:
appio import information-model -n SmartLiter -p path/to/slsNodeset.xml && \
appio import information-model -n SmartPump -p path/to/spNodeset.xml
Now we need to generate them:
appio generate information-model -n SmartLiter && \
appio generate information-model -n SmartPump
Adding References to the client
After the configuration of the OPC UA servers we need to add server references to the client:
appio reference add --client SmartWaterManager --server SmartLiter   && \
appio reference add --client SmartWaterManager --server SmartPump
Creating a solution
For conviences we will create a solution and add the opcuaapps:
appio new sln -n PumpSolution                               && \
appio sln add -s PumpSolution --project SmartPump           && \
appio sln add -s PumpSolution --project SmartLiter          && \
appio sln add -s PumpSolution --project SmartWaterManager
Implementing the business logic code
In the generated file you will find placeholders for making the connection between your business logic and the opcuaapp. This File is called mainCallbacks.c
Example:
// callback of Method
UA_MethodCallback MethodCallback(UA_Server *server, const UA_NodeId *sessionId, void *sessionContext, const UA_NodeId *methodId, void *methodContext, const UA_NodeId *objectId, void *objectContext, size_t inputSize, const UA_Variant *input, size_t outputSize, UA_Variant *output)
{
    // Your Method call of your business code goes here
    return UA_STATUSCODE_GOOD;
}
For the convience of this tutorial we prepared all files. You will find them in the examples folder we provided.
Here for the SmartPump:
cp pathTo/APPIOframework/examples/smart_pump_example/source/smart_pump/mainCallbacks.c SmartPump/src/server/mainCallbacks.c  &&
cp pathTo/APPIOframework/examples/smart_pump_example/source/smart_pump/pumpSimulation.c SmartPump/src/server/pumpSimulation.c
Here for the smart liter sensor:
cp pathTo/APPIOframework/examples/smart_pump_example/source/smart_liter_sensor/tankSimulation.c SmartLiter/src/server/tankSimulation.c &&
cp pathTo/APPIOframework/examples/smart_pump_example/source/smart_liter_sensor/mainCallbacks.c SmartLiterSensor/src/server/mainCallbacks.c
And now for the client:
cp pathTo/APPIOframework/examples/smart_pump_example/source/smart_water_manager/main.c SmartWaterManager/src/client/main.c &&
cp pathTol/APPIOframework/examples/smart_pump_example/source/smart_water_manager/manager.c SmartWaterManager/src/client/manager.c
building and testing
Now it’s time to build and test this solution:
appio sln build -s PumpSolution  && \
appio sln publish -s PumpSolution
Now start all the opcuaapps and test it with the front end client. The pump should be turned on / off when the value provide by the sensor crosses the limit.